

Wavemakers Virtual Campus: Employer Booth Setup Guide
Welcome to the Wavemakers Virtual Campus. This guide will help you access the campus, find your booth and prepare to connect with students at your upcoming career event.
The Wavemakers Virtual Campus is powered by Virbela, an immersive online platform where you use a personalized avatar to move around, explore employer booths and speak with other attendees. You can join from a compatible computer. No VR headset is required.
Please complete your setup and test your access well before event day so we can help resolve any technical issues.
You can access a PDF version of this guide here
1. Download and install the campus
Download the Wavemakers Virtual Campus and follow the installation instructions.
Before installing:
Review Virbela’s hardware and software requirements to confirm that your computer is compatible. Chromebooks and tablets are not supported.
If you are using a work computer, check whether you need assistance or permission from your IT team to install the application.
2. Log in and test your access
Use the same email address you provided on your event registration form.
Test your access using the computer and internet connection you plan to use on event day. Corporate networks, firewalls or VPNs may affect your ability to download or access the campus. If you encounter difficulties, contact your IT team or Wavemakers for support.
Once you are logged in, check that your microphone and speakers or headphones are working.
3. Create your avatar and explore
When you log into the Wavemakers Virtual Campus, you can create your personalized avatar.
Click on your name in the upper-left corner of your screen.
Click on Change Avatar. This will take you to a dressing room where you can customize your avatar’s appearance and clothing.
When you are done, click Finish to return to the campus.
Take a few minutes to practice moving around. These videos can help you become familiar with the Virbela platform:
4. Find the Career Fair building
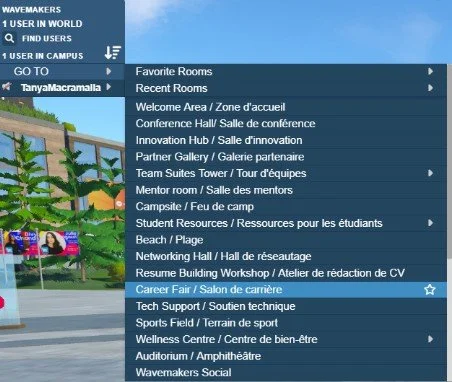
Click the GO TO menu in the upper-left corner of your screen and select Career Fair.
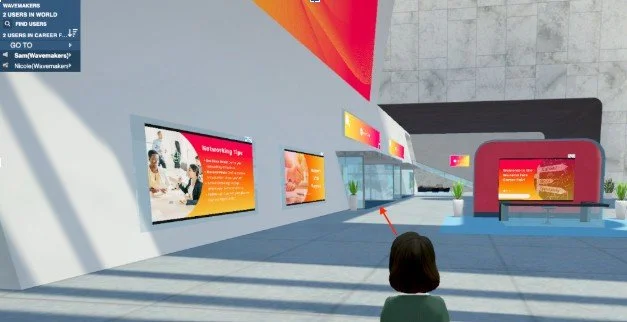
You will arrive at the landing area of the Career Fair space. Move your avatar forward, then enter the Career Fair building on your left.
5. Locate your booth
Wavemakers will email you your assigned booth number before the event.
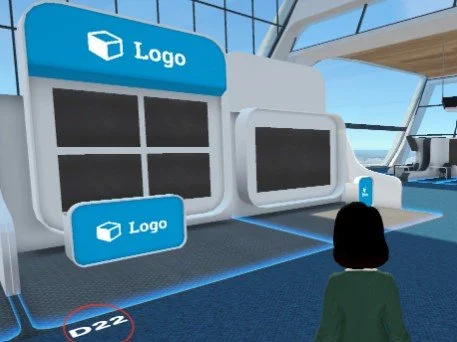
Inside the building, look for the booth numbers displayed on the floor to find your space.
6. Add your booth branding and materials
Prepare the images and materials you would like students to see, such as your organization’s logo, information about your workplace and available opportunities.
Images generally resize automatically to fit the display area when you customize your booth.
Maximum image file size: 2 MB per file.
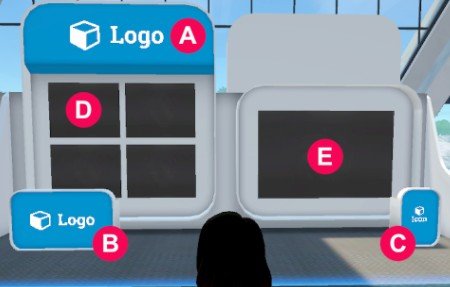
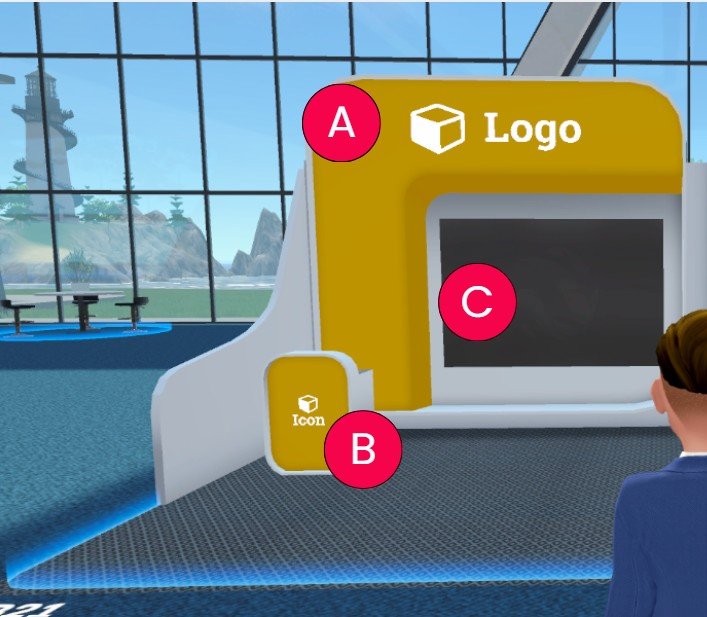
There are two booth sizes: medium and small. Booth sizes are assigned based on the overall size of the event. Refer to the images below to identify your company’s assigned booth type, then use the dimensions in the corresponding table to prepare your images.
If an uploaded image appears stretched or distorted, adjust it to the recommended dimensions for your booth size and upload it again.
Medium booth
(A) Top Logo Banner: 900 x 300 pixels
(B) Podium Logo: 300 x 600 pixels
(C)Podium Icon: 300 x 300 pixels
(D)Image Boards: 960 x 750 pixels
(E) Web Board: 900 x 600 pixels (slide)
Small booth
(A) Top Logo Banner: 900 x 300 pixels
(B) Podium Icon: 300 x 300 pixels
(C)Web Board: 900 x 600 pixels (slide)
To upload an image:
Right-click the display area you want to update.
Click the Upload button.
Select the image file from your computer.
Check that the image displays correctly.
If your file exceeds the size limit, a notification will appear in the chat area in the lower-left corner of your screen. Reduce the file size and try uploading it again.
Video: Setting up your booth and using private volumes
7. Plan how your team will use the booth
Your booth includes two private conversation areas, called private volumes. These areas allow you to speak with students without being heard by people outside the area.
To hold a conversation, you and the student must be inside the same private area. People outside that area cannot hear or join the conversation unless they enter it. Other attendees who enter the same area can hear the discussion.
If more than one representative is attending, consider these approaches:
Welcome students and hold conversations: One representative stays outside the private areas to greet students passing by, while another speaks with students inside a private area.
Offer group and individual conversations: One representative hosts small group discussions in one private area, while another uses the second area for individual conversations.
Practice using these areas with your colleagues before the event so everyone understands where to stand and how the audio works.
8. Complete a final check
Before event day, confirm that:
Each attending representative can log in and find your booth.
Your booth images display correctly.
Your microphone and speakers or headphones work.
Your representatives are comfortable moving around and using the private conversation areas.
Need support?
If you need help accessing the campus or setting up your booth, please contact jack@wavemakers.network.
Thank you for joining us. We look forward to welcoming your team to the Wavemakers Virtual Campus!